Fragments: A Little Background
Update: The actual application is available on the Google Play store.
Once upon a time, Android developers used only two things called activities and views in order to create their user interfaces. If you're like me and you come from a desktop programming environment, an Activity is sort of like a form or a window. Except it's more like a controller for one of these classes. With that analogy in place, a view is then similar to a control. It's the visual part you're interacting with as a user. I remember the learning curve being pretty steep for me being so stuck in my desktop (C# and WPF) development, but once I came up with these analogies on my own, it seemed pretty obvious. So to make an Android application, one would simply put some views together and chain some activities to show these views. Pretty simple.
Something changed along the way though. It was apparent that the Activity/View paradigm was a bit lacking so something new was added to the mix: The Fragment. Fragments were introduced in Android 3.0 (which is API level 11). Fragments added the flexibility to be able to swap out parts of an activity without having to completely redefine the whole view. This means that having an application on a mobile phone with a small screen can appear differently than when it's on a large tablet, and as a developer you don't have to redesign the whole bloody thing. Awesome stuff!
So, to clarify, a fragment is just a part of the activity. By breaking up activities into fragments, you get the modular flexibility of being able to swap in and out components at will. If you're like me and you took a break from Android when fragments were introduced, then you may have another little learning curve. The goal of this article is to create a tabbed Android user interface using fragments.
For what it's worth, when I first tried putting together a tabbed UI with fragments, it was a complete mess. I was surfing the net for examples, but I couldn't find anything that really hit it home for me. Once I had it working, I decided I should redo it and document the process. That's how this article came to be! Another side note... I'm a C# developer by trade and I haven't developed with Android/Java within a team. If you don't like my coding conventions then please try to look past that to get the meat of the article!
As per usual, you can follow along by downloading all of the code ahead of time. Please check out the section at the end of the article and pick whichever option you'd like to get the source!
Setting Up: Getting Your Project Together
I'm going to make a few assumptions here. You should have Eclipse installed with the latest Android Development Tools. There are plenty of examples out there for how to get your environment put together, but I'm not going to cover that here.
You're going to want to start by making a new Android Application in eclipse. By going to the "File" menu, then the "New" sub menu, then the "Other" sub menu, you should get a dialog letting you pick Android application. You'll get a wizard that looks like the following (where I've filled in the information with what I'll be using for this entire example):
[caption id="attachment_497" align="alignnone" width="445"]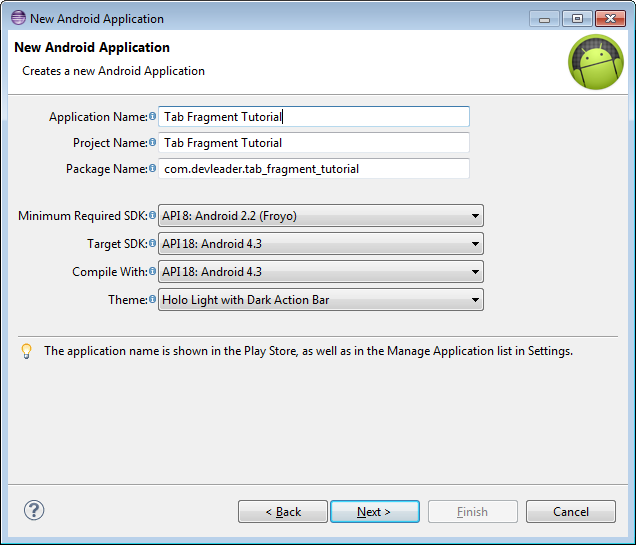 The first part of the wizard is setting up your Android project.[/caption]
The wizard gives you some options for what you want to have it generate for you. In this case, I opted out of having a custom icon (since that's not really important for this tutorial) and I chose to have it create an activity for me.
[caption id="attachment_498" align="alignnone" width="445"]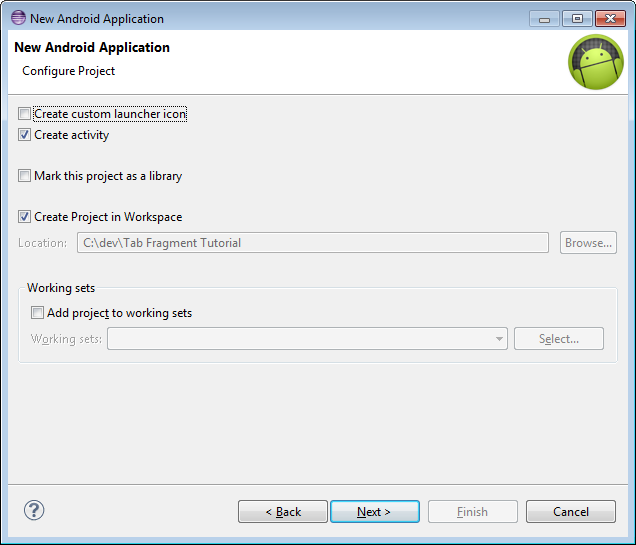 The second step in the wizard lets you choose what to create. I wanted just the activity made.[/caption]
Our activity is actually going to be pretty light-weight. The bulk of what we're going to be doing is going to be inside of our fragments. Because of this, we should be totally fine just making our main activity a simple blank activity.
[caption id="attachment_499" align="alignnone" width="445"]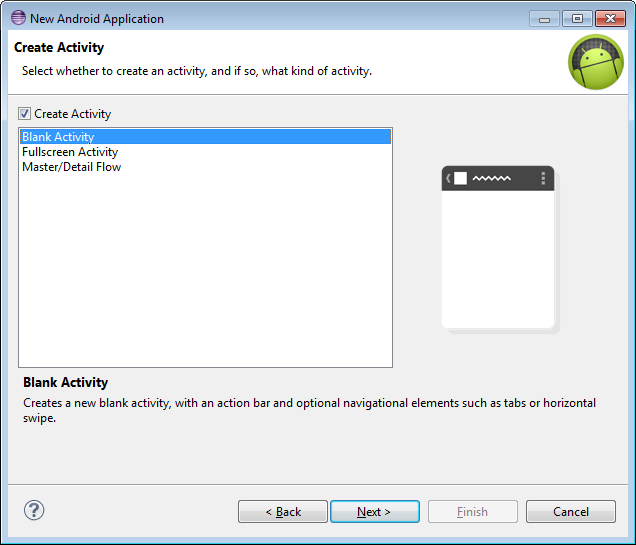 We won't have much code in our main activity. Let's just opt for the blank activity.[/caption]
The final step in the wizard just wants you to confirm the naming for your generated code.
[caption id="attachment_500" align="alignnone" width="445"]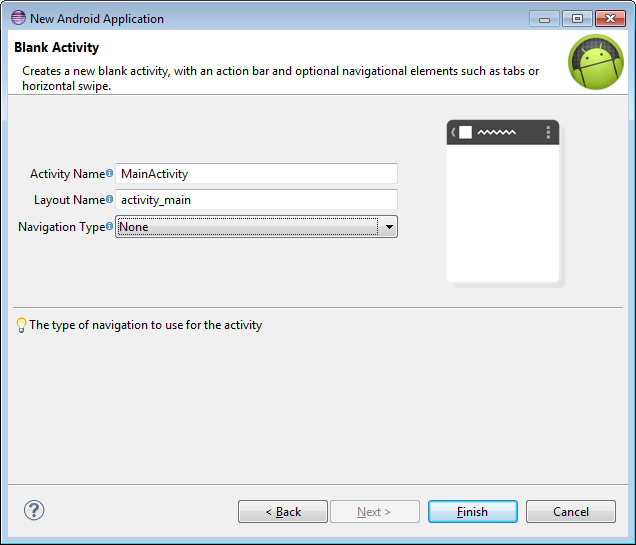 Let's create our "MainActivity" activity with a layout called "activity_main". Pretty straight forward.[/caption]
At this point, we actually have an Android application that we can deploy to a phone or a virtual device. If you're new to Android programming, I suggest you try it out. It's pretty exciting to get your first little application running.
The Layouts
The layout XML files in Android provide the hierarchies of views that will get shown in the UI. If you haven't modified the one that was created by default, it will probably look like this:
[caption id="attachment_504" align="alignnone" width="614"]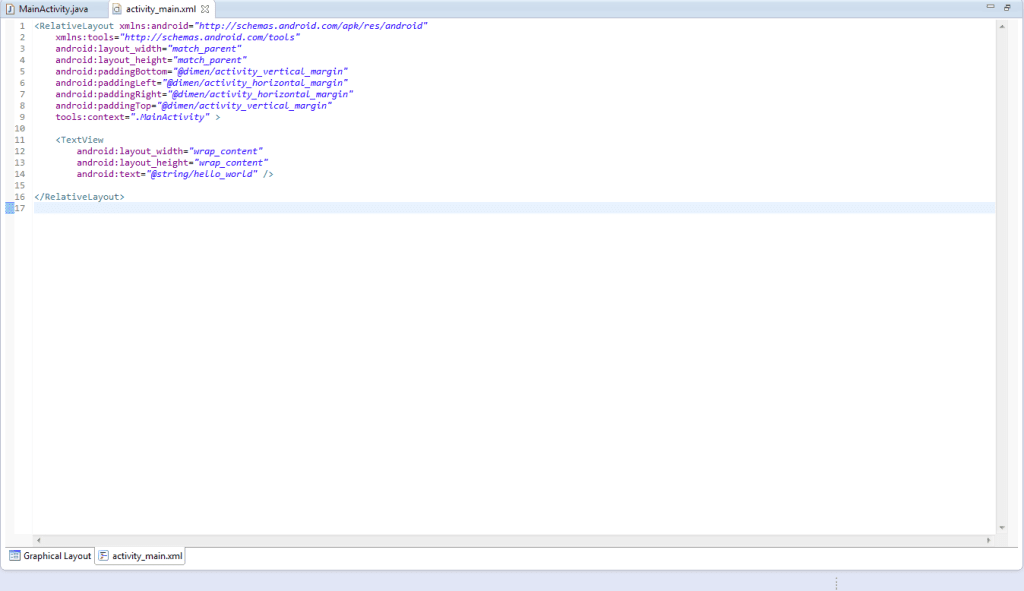 The default Main Activity XML will look like this. It's really just a text view that says "Hello World".[/caption]
What does that give us? Well, we get a RelativeLayout view that acts as a container for a TextView. The TextView says "Hello World". Amazing, right?
Let's switch up our main activity's layout a bit. Instead of a RelativeLayout, let's drop in a linear layout that has a vertical orientation. We'll blow away the TextView too, and drop in a Fragment. Our fragment will need to point to our custom fragment class (which we haven't created yet). For now, make the class "com.devleader.tab_fragment_tutorial.TabsFragment". Later in the example, we'll create the TabsFragment class and put it within this package. When the application runs, it will load up our custom fragment (specified by the full class name) and place it within our LinearLayout.
The layout XML for the main activity looks like the following:
[xml]
<LinearLayout xmlns:android="http://schemas.android.com/apk/res/android" android:orientation="vertical" android:layout_width="fill_parent" android:layout_height="fill_parent">
<fragment class="com.devleader.tab_fragment_tutorial.TabsFragment" android:id="@+id/tabs_fragment" android:layout_width="fill_parent" android:layout_height="fill_parent" /> </LinearLayout>
[/xml]
We're going to need a layout for our tabs fragment. This is going to be the view portion of the UI that gets dropped in to our main activity. It's going to be responsible for showing the tabs at the top of the UI and then providing container views for the contents that each tab will want to show.
In order to create this layout, right click on your "layout" folder nested within the "res" folder in the Eclipse IDE. Go to "new", and then click on the "Other" child menu. Pick "Android XML Layout File" from your list of options. Select "TabHost" as the layout's root element. Let's call this file "fragment_tabs.xml".
The top level component in this layout will be a TabHost. We'll put our TabWidget in next, which is going to contain the actual tab views, and then a FrameLayout with two nested FrameLayouts inside of it for holding the contents that we want to show for each tab. To clarify, the user will be clicking on views within the TabWidget to pick the tab, and the contents within the tab1 and tab2 FrameLayouts will show the corresponding user interface for each tab.
The layout XML for the tabs fragment looks like the following:
[xml]
<TabHost xmlns:android="http://schemas.android.com/apk/res/android" android:id="@android:id/tabhost" android:layout_width="fill_parent" android:layout_height="fill_parent" android:background="#EFEFEF">
<LinearLayout android:orientation="vertical" android:layout_width="fill_parent" android:layout_height="fill_parent">
<TabWidget android:id="@android:id/tabs" android:layout_width="fill_parent" android:layout_height="wrap_content" />
<FrameLayout android:id="@android:id/tabcontent" android:layout_width="fill_parent" android:layout_height="fill_parent">
<FrameLayout android:id="@+id/tab1" android:layout_width="fill_parent" android:layout_height="fill_parent" android:background="#FFFF00" />
<FrameLayout android:id="@+id/tab2" android:layout_width="fill_parent" android:layout_height="fill_parent" android:background="#FF00FF" />
</FrameLayout> </LinearLayout> </TabHost>
[/xml]
You may have noticed I used some pretty aggressive hard-coded colors in the layout file. I highly advise you switch these to be whatever you want for your application, but when I'm debugging UI layouts I like to use really high contrasting colors. This helps me know exactly where things are (as opposed to having 10 views all with the same background). Maybe I'm a bit crazy, but I find it really helpful.
Now that we have the main activity done and the tab fragment all set up, the last thing we need is to create some sort of layout for our individual tab views. This will be the view that is placed inside of the TabWidget on our tabs fragment layout. These views will have the title of the tab and they'll be what the user actually interacts with in order to switch tabs.
The layout XML for our simple tab view looks like the following:
[xml]
<?xml version="1.0" encoding="utf-8"?> <LinearLayout xmlns:android="http://schemas.android.com/apk/res/android" android:layout_width="wrap_content" android:layout_height="wrap_content" android:orientation="vertical" >
<TextView android:id="@+id/tabTitle" android:layout_width="fill_parent" android:layout_height="wrap_content" android:textAppearance="?android:attr/textAppearanceLarge" />
</LinearLayout>
[/xml]
And that's it for layouts! Just these three simple files. Now, we need to fill out our classes!
The Classes
If we start from the beginning with the classes, the first (and only) class that gets generated for you is the MainActivity class. If you left it untouched (hopefully you did since there was no indication to change it yet!) then you should have a class that looks like:
[caption id="attachment_507" align="alignnone" width="614"]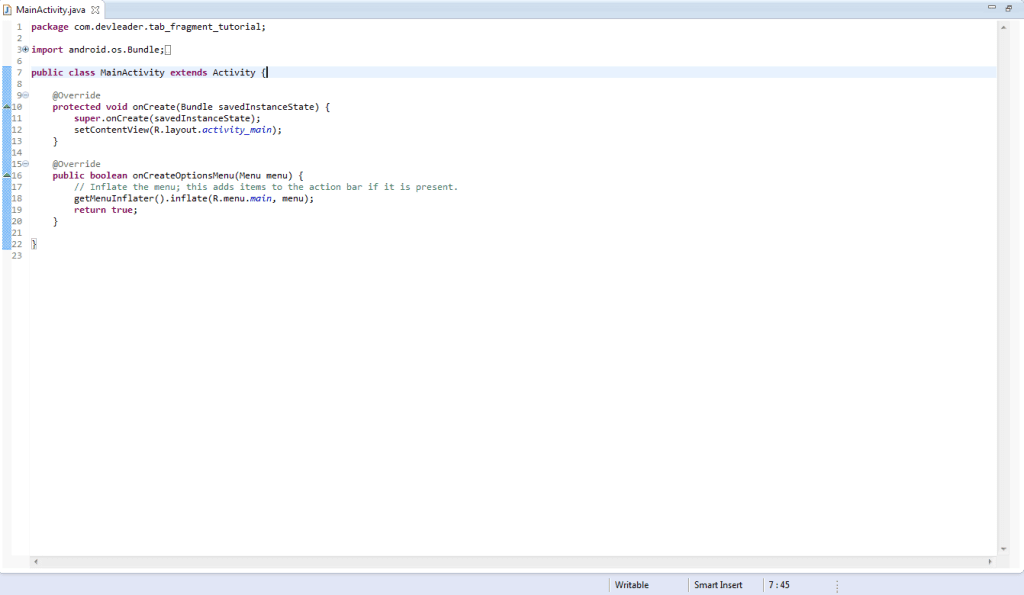 The default MainActivity class that gets generated after we complete the steps in the wizard.[/caption]
In order to make this example work, we barely even need to modify this class at all. You'll notice our MainActivity extends the Activity class. Because we're going to be using fragments in our application, we need to modify this class to extend the FragmentActivity. In this entire example, I opted to use the Android v4 Support Library. Thus, in order to make this example work, please ensure you're using FragmentActivity from the package "android.support.v4.app.FragmentActivity".
Once you've made this replacement ("Activity" for "FragmentActivity") we're all done in this class. Great stuff, right? Let's move on.
We're going to want to make a class that defines what a tab is. In order to make some nice re-usable code that you can extend, I decided to make a base class that defines minimum tab functionality (at least in my opinion). Feel free to extend upon this class later should your needs exceed what I'm offering in this tutorial.
The base TabDefinition class will:
- Take in the ID of the view where the tab's content will be put. In our example, this will be the ID for tab1 or tab2's FrameLayout.
- Provide a unique identifier to look up the tab.
- Be required to provide the Fragment instance that will be used when the tab is activated.
- Be required to create the tab view that the user will interact with in order to activate the tab.
[java]
package com.devleader.tab_fragment_tutorial;
import java.util.UUID;
import android.support.v4.app.Fragment; import android.view.LayoutInflater; import android.view.View; import android.view.ViewGroup;
/**
- A class that defines a UI tab. */ public abstract class TabDefinition { // // Fields // private final int _tabContentViewId; private final String _tabUuid;
// // Constructors // /**
- The constructor for {@link TabDefinition}.
- @param tabContentViewId The layout ID of the contents to use when the tab is active. */ public TabDefinition(int tabContentViewId)
// // Exposed Members // /**
- Gets the ID of the tab's content {@link View}.
- @return The ID of the tab's content {@link View}. */ public int getTabContentViewId() { return _tabContentViewId; }
/**
- Gets the unique identifier for the tab.
- @return The unique identifier for the tab. */ public String getId() { return _tabUuid; }
/**
- Gets the {@link Fragment} to use for the tab.
- @return The {@link Fragment} to use for the tab. */ public abstract Fragment getFragment();
/**
- Called when creating the {@link View} for the tab control.
- @param inflater The {@link LayoutInflater} used to create {@link View}s.
- @param tabsView The {@link View} that holds the tab {@link View}s.
- @return The tab {@link View} that will be placed into the tabs {@link ViewGroup}. */ public abstract View createTabView(LayoutInflater inflater, ViewGroup tabsView); }
[/java]
Now that we have the bare-minimum definition of what a tab in our UI looks like, let's make it even easier to work with. In my example, I just want to have my tabs have a TextView to display a title--They're really simple. I figured I'd make a child class of TabDefinition called SimpleTabDefinition. The goal of SimpleTabDefinition is really just to provide a class that takes the minimum amount of information to get a title put onto a custom view.
Please keep in mind that there are many ways to accomplish what I'm trying to illustrate here, but I personally felt having a base class with a more specific child class would help illustrate my point. You could even put in a second type of child class that would make a graphical tab that shows a graphical resource instead of a string resource. Tons of options!
Let's add another new class called "SimpleTabDefinition" to the package "com.devleader.tab_fragment_tutorial". The code for SimpleTabDefinition is as follows:
[java]
package com.devleader.tab_fragment_tutorial;
import android.support.v4.app.Fragment; import android.view.Gravity; import android.view.LayoutInflater; import android.view.View; import android.view.ViewGroup; import android.widget.LinearLayout; import android.widget.TextView; import android.widget.LinearLayout.LayoutParams;
/**
- A class that defines a simple tab. */ public class SimpleTabDefinition extends TabDefinition { // // Fields // private final int _tabTitleResourceId; private final int _tabTitleViewId; private final int _tabLayoutId; private final Fragment _fragment;
// // Constructors // /**
The constructor for {@link SimpleTabDefinition}.
@param tabContentViewId The layout ID of the contents to use when the tab is active.
@param tabLayoutId The ID of the layout to use when inflating the tab {@link View}.
@param tabTitleResourceId The string resource ID for the title of the tab.
@param tabTitleViewId The layout ID for the title of the tab.
@param fragment The {@link Fragment} used when the tab is active. */ public SimpleTabDefinition(int tabContentViewId, int tabLayoutId, int tabTitleResourceId, int tabTitleViewId, Fragment fragment) { super(tabContentViewId);
_tabLayoutId = tabLayoutId; _tabTitleResourceId = tabTitleResourceId; _tabTitleViewId = tabTitleViewId; _fragment = fragment; }
// // Exposed Members // @Override public Fragment getFragment() { return _fragment; }
@Override public View createTabView(LayoutInflater inflater, ViewGroup tabsView) { // we need to inflate the view based on the layout id specified when // this instance was created. View indicator = inflater.inflate( _tabLayoutId, tabsView, false);
// set up the title of the tab. this will populate the text with the
// string defined by the resource passed in when this instance was
// created. the text will also be centered within the title control.
TextView titleView = (TextView)indicator.findViewById(_tabTitleViewId);
titleView.setText(_tabTitleResourceId);
titleView.setGravity(Gravity.CENTER);

// ensure the control we're inflating is layed out properly. this will
// cause our tab titles to be placed evenly weighted across the top.
LinearLayout.LayoutParams layoutParams = new LinearLayout.LayoutParams(
  LayoutParams.WRAP_CONTENT,
  LayoutParams.WRAP_CONTENT);
layoutParams.weight = 1;
indicator.setLayoutParams(layoutParams);

return indicator;
} }
[/java]
Awesome stuff. Now we can define tabs easily in our application. We just have one more class left, I promise! In the following section, I'll re-iterate over everything, so if you're feeling a bit lost... Just hang in there.
The one part we're actually missing is the fragment that will manage all of our tabs. We created the layout for it already, which has a TabHost, a TabWidget (to contain the clickable tab views), and some FrameLayouts (that contain the content we show when we press a tab). Now we just need to actually attach some code to it!
The TabsFragment class that we're going to want to add to the package "com.devleader.tab_fragment_tutorial" is responsible for a few things. First, we're going to be defining our tabs in here. This class will be responsible for taking those tab definitions and creating tabs that get activated via the TabHost. As a result, this fragment class is going to have to implement the OnTabChangedListener interface. This will add a method where we handle switching the fragment shown to match the fragment for the contents of the tab that was pressed.
The code for our TabsFragment class looks like the following:
[java] package com.devleader.tab_fragment_tutorial;
import android.os.Bundle; import android.support.v4.app.Fragment; import android.support.v4.app.FragmentManager; import android.view.LayoutInflater; import android.view.View; import android.view.ViewGroup; import android.widget.TabHost; import android.widget.TabHost.OnTabChangeListener; import android.widget.TabHost.TabSpec;
/**
- A {@link Fragment} used to switch between tabs. */ public class TabsFragment extends Fragment implements OnTabChangeListener { // // Constants // private final TabDefinition[] TAB_DEFINITIONS = new TabDefinition[] { new SimpleTabDefinition(R.id.tab1, R.layout.simple_tab, R.string.tab_title_1, R.id.tabTitle, new Fragment()), new SimpleTabDefinition(R.id.tab2, R.layout.simple_tab, R.string.tab_title_2, R.id.tabTitle, new Fragment()), };
// // Fields // private View _viewRoot; private TabHost _tabHost;
// // Exposed Members // @Override public void onTabChanged(String tabId) { for (TabDefinition tab : TAB_DEFINITIONS) { if (tabId != tab.getId()) { continue; }
  updateTab(tabId, tab.getFragment(), tab.getTabContentViewId());
  return;
}

throw new IllegalArgumentException("The specified tab id '" + tabId + "' does not exist.");
}
@Override public View onCreateView(LayoutInflater inflater, ViewGroup container, Bundle savedInstanceState) { _viewRoot = inflater.inflate(R.layout.fragment_tabs, null);
_tabHost = (TabHost)_viewRoot.findViewById(android.R.id.tabhost);
_tabHost.setup();

for (TabDefinition tab : TAB_DEFINITIONS) {
  _tabHost.addTab(createTab(inflater, _tabHost, _viewRoot, tab));
}

return _viewRoot;
}
@Override public void onActivityCreated(Bundle savedInstanceState) { super.onActivityCreated(savedInstanceState); setRetainInstance(true);
_tabHost.setOnTabChangedListener(this);

if (TAB_DEFINITIONS.length > 0) {
  onTabChanged(TAB_DEFINITIONS[0].getId());
}
}
// // Internal Members // /**
Creates a {@link TabSpec} based on the specified parameters.
@param inflater The {@link LayoutInflater} responsible for creating {@link View}s.
@param tabHost The {@link TabHost} used to create new {@link TabSpec}s.
@param root The root {@link View} for the {@link Fragment}.
@param tabDefinition The {@link TabDefinition} that defines what the tab will look and act like.
@return A new {@link TabSpec} instance. */ private TabSpec createTab(LayoutInflater inflater, TabHost tabHost, View root, TabDefinition tabDefinition) { ViewGroup tabsView = (ViewGroup)root.findViewById(android.R.id.tabs); View tabView = tabDefinition.createTabView(inflater, tabsView);
TabSpec tabSpec = tabHost.newTabSpec(tabDefinition.getId()); tabSpec.setIndicator(tabView); tabSpec.setContent(tabDefinition.getTabContentViewId()); return tabSpec; }
/**
- Called when switching between tabs.
- @param tabId The unique identifier for the tab.
- @param fragment The {@link Fragment} to swap in for the tab.
- @param containerId The layout ID for the {@link View} that houses the tab's content. */ private void updateTab(String tabId, Fragment fragment, int containerId) { final FragmentManager manager = getFragmentManager(); if (manager.findFragmentByTag(tabId) == null) { manager.beginTransaction() .replace(containerId, fragment, tabId) .commit(); } } }
[/java]
And that's it! Just four classes in total, and one of them (MainActivity) was almost a freebee!
Putting It All Together
Let's recap on all of the various pieces that we've seen in this example. First, we started with the various layouts that we'd need. Our one and only activity is pretty bare bones. It's going to contain our tabs fragment view. The tabs fragment view is responsible for containing the individual tabs a user clicks on as well as the content that gets displayed for each tab. We also added a layout for really simplistic tab views that only really contain a TextView that shows the tab's title.
From there, we were able to look at the classes that would back up the views. To use our fragment implementation, we only had to modify our parent class of our only activity. I opted to create some classes that define tab functionality to make extending the UI a bit easier, and adding additional child classes that fit in this pattern is simple. The TabsFragment class was the most complicated part of our implementation, and truth be told, that's where most of the logic resides. This class was responsible for defining the tabs we wanted to show, and what fragments we would swap in when each tab was clicked.
In order to extend this even more, the things you'll want to consider are:
- Defining your own type of tab definition classes. Maybe you want to look at graphical tabs, or something more complicated than just a title.
- Implementing your own fragment classes that you display when your tabs are clicked. In the example, the contents of the tabs are empty! This is definitely something you'll want to extend upon.
- Adding more tabs! Maybe you need three or four tabs instead of two.
- Paste Bin
- Google Code
- BitBucket
- GitHub

